Industrial Exhaust Fan Noise: Causes and How to Reduce It
Published: Author: Rachel
A wall-mounted exhaust fan that has run quietly for two years starts to drone. Or a new installation passes its airflow check, then the complaints start from the office two rooms away. In both cases the instinctive response — buy a bigger silencer, or live with it — is usually wrong, because “fan noise” is not one problem. It is at least three, and each one has a different fix.
This guide is written for the people who get the call: maintenance engineers, EHS staff and purchasers in factories and workshops. It separates the three noise families, gives a field diagnosis you can run in one shift, then works through the remedies in the order that treats the source first — the sequence that effective industrial exhaust fan noise reduction almost always follows.
Why Your Exhaust Fan Is Loud: Three Different Noise Sources
Before reaching for any product labelled as an exhaust fan noise reducer, identify which family the noise belongs to. The families respond to completely different treatments, and applying the wrong one wastes both money and a maintenance window.
Aerodynamic Noise: The Dominant Source
Aerodynamic noise is generated by the blades working on the air. It has two distinguishable components. The first is broadband: vortices shedding off the blade surfaces and the turbulence of air accelerated through the inlet, the guard grille and the housing cutout. The ear hears this as a rushing, hissing quality. The second is a discrete tone at the blade passing frequency — the pitch produced each time a blade passes a fixed obstruction such as a strut or the guard wires. The ear hears this as a whine or hum whose pitch rises with speed.
Aerodynamic noise dominates in a healthy, well-maintained fan. That matters for remediation: it means the most effective lever is changing how the blades interact with the air, not adding absorbing material afterwards. It also means the noise grows steeply with blade tip speed, which is why the same fan frame can sound entirely different at two operating points.
Mechanical Noise: Bearings, Imbalance and Looseness
Mechanical noise originates in the rotating assembly and its supports. Worn or dry bearings produce a rough, gritty character rather than a clean rush. Rotor imbalance — dust caked on one blade, a bent blade after impact, or a lost balance weight — produces vibration at the rotation frequency, which radiates from every panel the fan shakes. Loose fasteners, fatigued mounts and degraded gaskets convert that vibration into rattles and buzzing.
Two signals distinguish mechanical from aerodynamic noise. First, mechanical noise changes character with load but not smoothly with speed: a bearing sounds rough at any speed, and imbalance noise persists even when the inlet is blanked briefly during a careful test. Second, mechanical problems worsen with time in a way aerodynamic noise does not. A fan that has grown louder over months is telling you something is wearing. If that is the situation you are in, our article on axial fan lifespan explains what typically wears out first and when replacement beats repair.
Electromagnetic Noise: The Hum That Speed Changes Cannot Fix
The third family comes from the motor itself: magnetostriction and magnetic forces in the windings and core produce a hum tied to the supply frequency and its harmonics, not to the airflow. You can recognise it because it persists when the impeller is decoupled and the motor spins free, and because it does not change when you alter the ducting or the inlet.
Electromagnetic hum is rarely the loudest component outdoors, but it travels well through structure and is surprisingly audible in quiet offices adjacent to a plant room. It is mostly fixed at design time — winding design, slot geometry, mounting resilience. In service, your levers are the mounting (resilient pads reduce the structure-borne path), the supply quality (voltage imbalance can worsen it, so have an electrician verify it), and ultimately motor replacement if the hum is new and growing. Do not expect silencers to touch it; they act on airborne sound in the duct, not on hum conducted through the frame.
Noise family
How it sounds
Changes when…
First effective response
Aerodynamic
Rushing, hissing; tonal whine at blade passing frequency
Speed changes; inlet blocked; duct altered
Reduce tip speed, improve blade and inlet design
Mechanical
Rough, gritty, rattling; vibration felt at the frame
Worsens over weeks/months; felt in the hand
Balance, bearings, tightening, mounting
Electromagnetic
Steady hum, often structure-borne
Little; persists with impeller decoupled
Resilient mounting, supply check, motor replacement
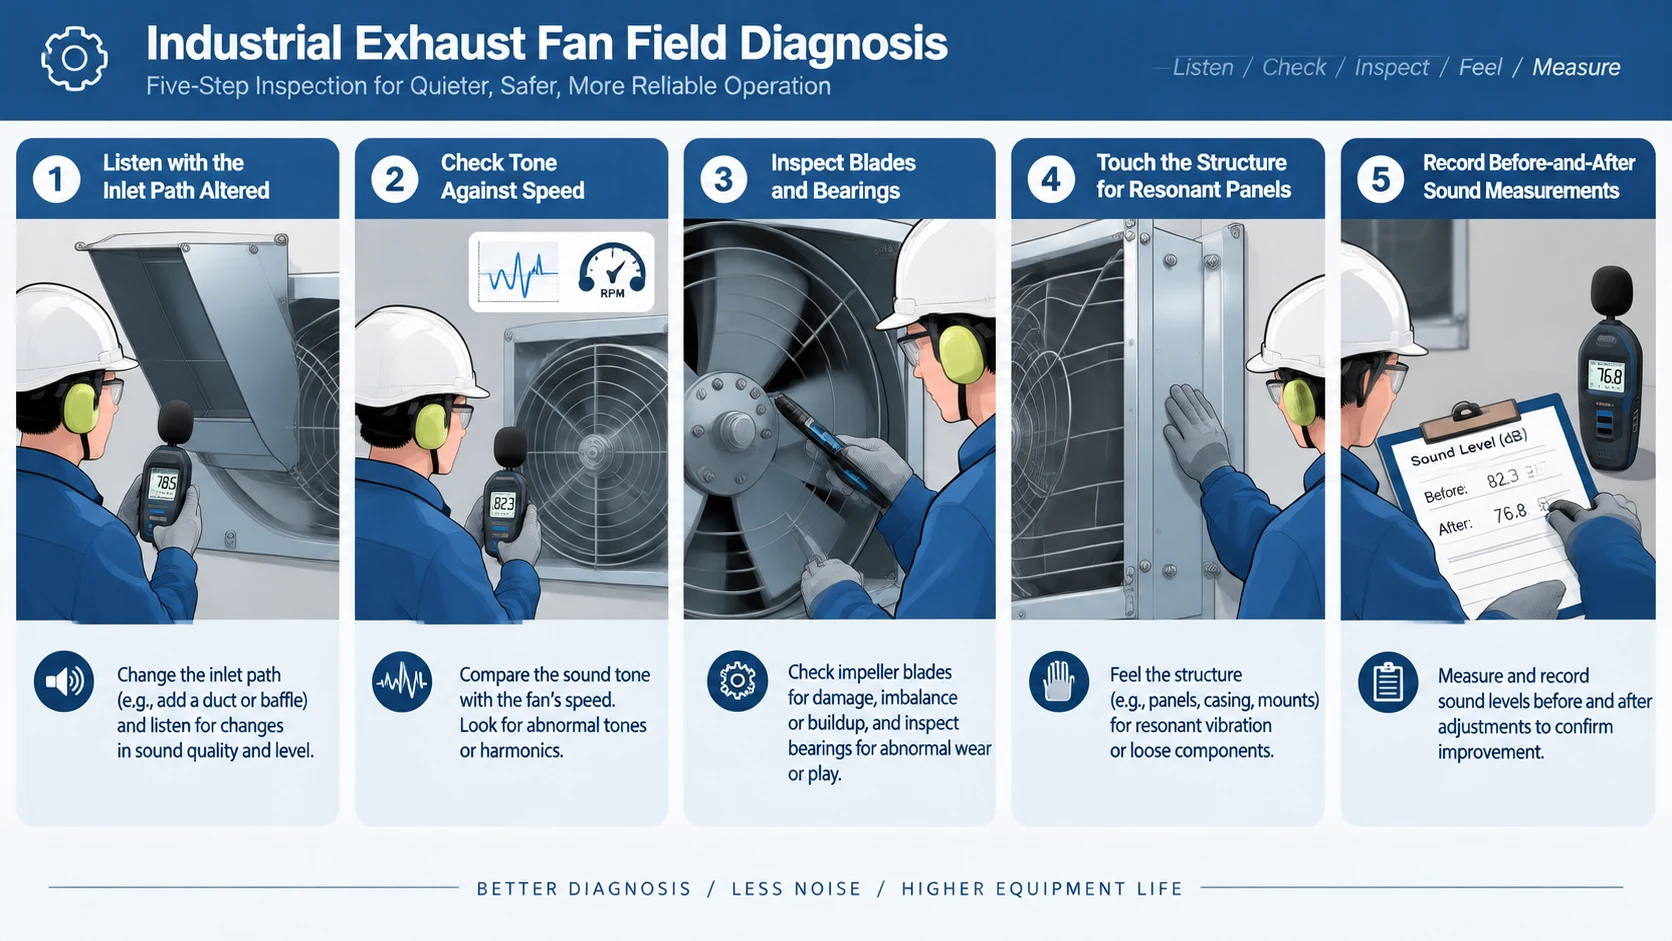
Which Noise Do You Have? A Field Diagnosis in Five Checks
Skip this section and you may buy the wrong fix. Most industrial exhaust fan noise reduction projects fail at this exact point — the remedy chosen before the noise family is known. The five checks below need no laboratory — a torch, a screwdriver, a vibration pen or even a fingertip, and a phone with a sound-level app are enough for a defensible first diagnosis.
Step 1 — Listen With the Housing Covered and Uncovered
With the fan running safely accessible, listen at the inlet, at the outlet and at the frame. Then, where it is safe to do so, briefly restrict part of the inlet flow or listen through a simple obstruction and compare. Aerodynamic noise changes character clearly when the airflow path changes; mechanical rattles and electromagnetic hum barely move. The fan that goes quieter when the guard is removed for cleaning but roars again when dust loads the blades is showing you a contamination-driven aerodynamic and imbalance problem at once.
Step 2 — Check Whether the Tone Tracks With Speed
If the fan is on a variable-speed drive or can be stepped between windings, listen as the speed changes. A whine whose pitch slides smoothly with speed is blade passing frequency — aerodynamic. A roughness that stays at the same character while the tone slides is mechanical. A hum that stays at a fixed, low pitch regardless of speed is electrical. This single test sorts most ambiguous cases.
Step 3 — Inspect Blades, Balance and Bearings
Isolate the fan electrically, lock out, and inspect. Look for dust deposits on blades (a classic imbalance source in dusty exhaust duty), bent or eroded blades, a loose impeller hub, and play in the shaft. Spin the impeller by hand: grittiness or notchy resistance in the bearings is audible and palpable. Confirm the guard and housing bolts are tight while you are there. For a fan in heavy dust duty, cleaning and rebalancing the impeller is often the single highest-value maintenance action available.
Step 4 — Test the Structure: Loose Fasteners and Resonant Panels
Run the fan and lay a fingertip or a vibration pen against the mounting frame, the wall bracket, adjacent duct and the wall panel itself. A panel or duct section that buzzes under your hand is being driven into resonance and is now a secondary radiator, often louder than the fan. Loose fasteners reveal themselves as local rattles. Mark every resonant element — these are the points where damping, stiffening or isolation will pay, and where adding mass alone may simply retune the resonance rather than remove it.
Step 5 — Measure Before You Spend
Record sound levels at fixed, marked positions — a metre from the inlet, at the nearest occupied position, and at the property line if neighbours matter — before and after any intervention, using the same app or meter and the same conditions. Without a before-and-after pair you cannot prove what worked, and you will not notice a mechanical fault quietly returning. Send the readings to the fan manufacturer if you want their support: they can compare your data with their test figures and tell you whether the unit is behaving normally. Actual installed noise is always somewhat above catalogue figures, because catalogue data is measured under laboratory conditions that your ducting and wall will not reproduce.
How to Cut Aerodynamic Noise at the Source
Once the diagnosis points at the airstream, work the source before the symptom. Aerodynamic noise scales strongly with tip speed, so speed is the first and largest lever.
Slow the Fan Down First
Reducing fan speed is the most effective single noise measure in most installations, because aerodynamic noise falls steeply as tip speed drops — typically far faster than airflow does. The catch is that airflow and pressure fall too, so this is a re-selection, not a free win: recheck the required exhaust volume for the process or room before committing. Where a drive or multi-speed motor allows it, many exhaust duties run comfortably at reduced speed for much of the day, with full speed held in reserve for peak heat or contaminant loads. If the fan was oversized at purchase — a common situation — slowing it recovers both noise and energy at once. The airflow arithmetic behind that check is covered in our guide to industrial exhaust fan selection.
Change the Blade, Not the Silencer
If the fan is correctly sized but inherently loud, the next move is blade and fan type, not attenuation. Within the axial family, blade count, blade camber and tip clearance all move the noise signature; a larger impeller at lower speed moving the same volume is typically quieter than a small impeller at high speed, all else being reasonable. Where pressure requirements are modest, a larger slow axial is the classic low-noise industrial exhaust fan choice; where the system needs more pressure, a different fan family may beat any bolt-on silencer. The practical differences between the families are set out in our guide to axial fan types, and the working principle behind the blade-noise relationship in how an axial fan works.
Confirm the swap with the manufacturer against your actual system resistance rather than free-air ratings — a quieter fan that cannot overcome the duct pressure will deliver less exhaust than the noisy one it replaced, which is a different complaint arriving by a different route.
Fix the Inlet Conditions
Swirling, pre-spun or obstructed inlet air is a noise multiplier. Keep a straight, unobstructed run of at least one duct diameter — more where the manufacturer recommends it — between the inlet and any elbow, wall opening or duct transition. Replace crushed or kinked flexible duct near the fan with smooth sections. Check that the guard is clean and that nothing stored near the inlet forms a whistle edge. These cost nothing, and in bad installations the improvement is immediately audible.
How to Silence Mechanical Noise
Dynamic Balancing and When It Pays
Imbalance vibrates the whole assembly at rotation frequency, and vibration radiates as noise from every surface it reaches. Cleaning deposits off blades and rebalancing the impeller — on site with a portable balancer, or by sending the impeller out — addresses the cause rather than the symptom. Balancing pays when the fan runs continuously, when the vibration is felt at the frame, and especially when the fan is mounted on a wall or roof structure where the vibration also fatigues the fixings. After any impact or blade repair, rebalance before returning to service; a blade that looks fine can still be out of balance enough to dominate the noise signature.
Bearing Upgrade and Replacement
Bearings announce their condition early: grittiness by hand, roughness by stethoscope or vibration pen, and a noise character that cleaning never improves. Replace them at the first reliable sign rather than waiting for the noise to mature into a seizure. Where duty is continuous, sealed ball-bearing constructions generally outlast and out-quiet open or sleeve types in industrial exhaust positions — the trade-offs between bearing types and what they mean for service life are a purchasing decision worth getting right. Confirm bearing spec and fit with the fan manufacturer or a qualified motor shop, and keep the grease or replacement intervals matched to the actual duty and environment.
Tightening, Alignment and Mounting Integrity
A scheduled torque check of the mounting bolts, guard fixings and duct connections is undramatic and disproportionately effective. Vibration loosens fasteners progressively, and each loose joint adds a rattle and a radiating surface. While you are there, check the impeller is still seated square on the shaft and that any belt drive (where fitted) is aligned and correctly tensioned — misalignment adds its own tonal noise and eats bearings. This is housekeeping, but on noisy installations it is housekeeping that shows up on the sound meter.
Vibration Isolation: Stopping Noise Before It Enters the Building
Noise does not only travel through air. A fan bolted rigidly to a wall bracket or roof structure conducts vibration into the building, which then re-radiates it as sound in rooms far from the fan. Isolation interrupts that path and is often the only measure that helps where the complaint comes from an adjacent occupied space rather than the fan’s own vicinity.
Soft Connections at the Duct
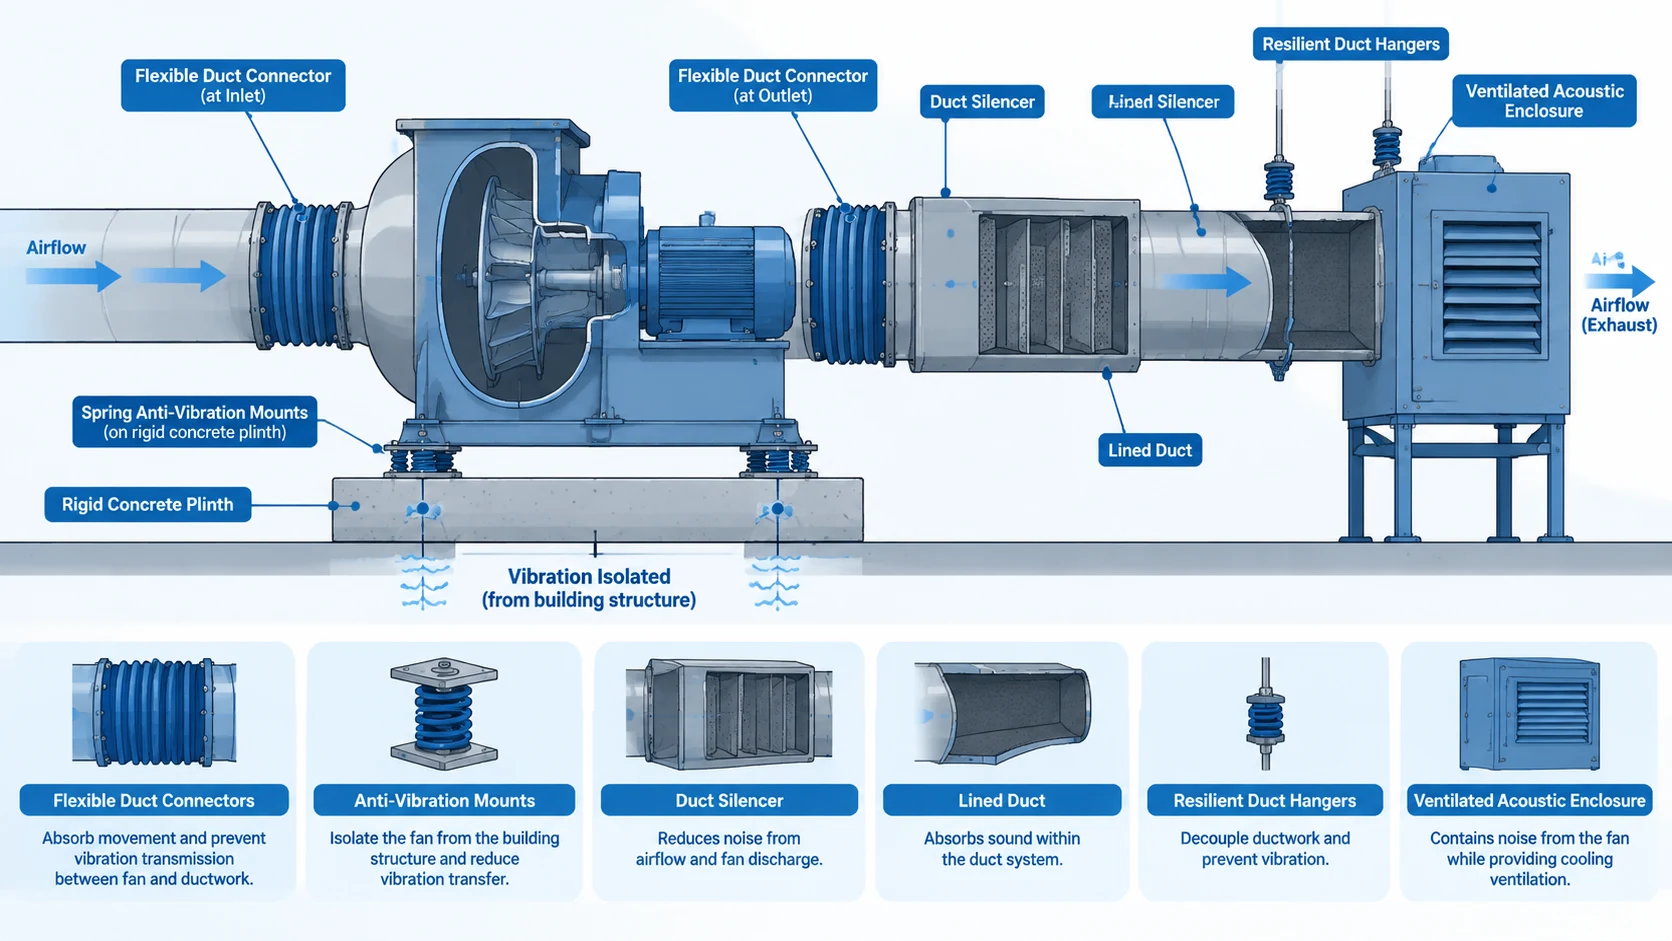
A flexible connector — a short fabric or elastomer section — between the fan outlet and rigid ductwork prevents the fan’s vibration from walking straight down the duct as structure-borne noise. Fit one at both inlet and outlet connections where the fan is ducted. Keep the flexible section slack enough to flex; pulled tight, it transmits vibration almost as well as steel. Also support the duct independently so its weight does not hang on the fan flange, and seal penetrations where the duct passes through walls with a resilient material rather than a rigid fill.
Anti-Vibration Mounts and Rigid Bases
Two principles, easily confused. The fan needs isolating from the structure beneath it, and the structure needs to be stiff enough not to act as an amplifier. Rubber or spring anti-vibration mounts under the fan base address the first; a rigid, massive base — a concrete plinth or a stiff steel frame — addresses the second. The common error is mounting a fan on a light steel bracket or thin wall panel: the support itself resonates, and no mount on the fan will fully fix noise radiated by the support. When the structure is light, add stiffness and damping to the structure first, then isolate the fan. Match mount stiffness to the fan’s weight and speed; confirm selection with the mount or fan manufacturer, because a mis-chosen mount can make low-speed vibration worse.
Hangers, Wall Brackets and Floor Slabs
Where the fan hangs from a roof or ceiling, use resilient hangers rather than rigid rod hangers, and check that the supporting member itself is not buzzing. Wall-mounted units transmit into masonry and then into floors; a resilient pad or spring bracket between bracket and wall is usually the cheapest effective step. On floor slabs, a small inertia base under spring mounts suits larger fans. The goal in every case is the same: give the vibration nowhere to convert itself back into audible structure noise.
What Silencers, Duct Liners and Enclosures Can and Cannot Do
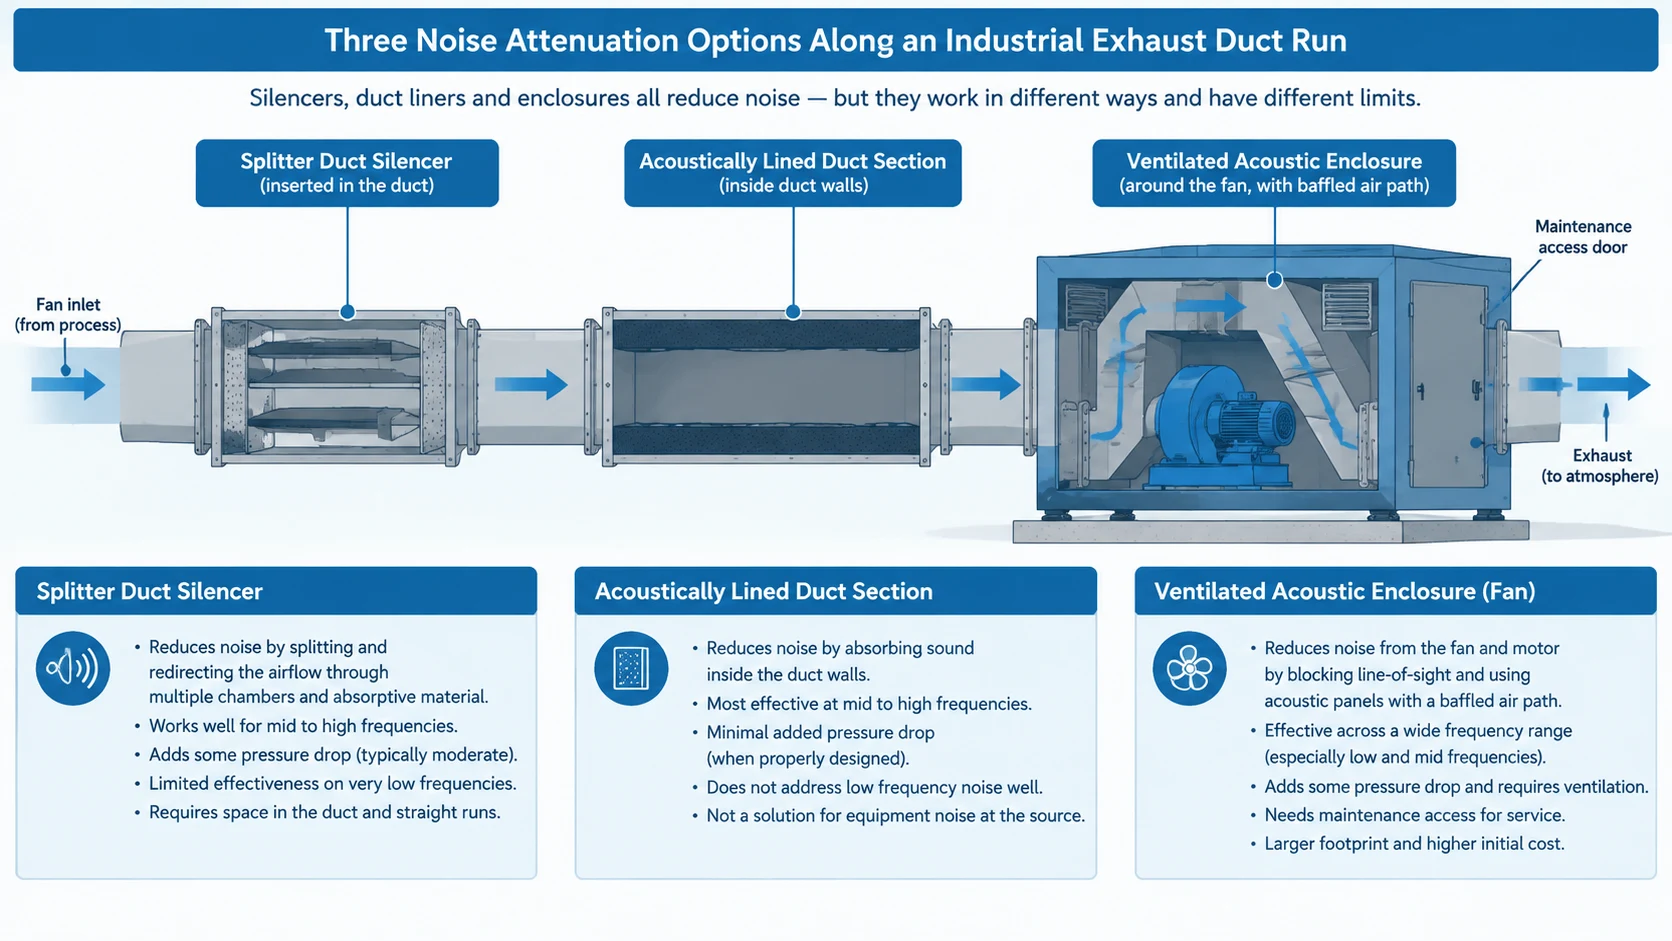
Attenuation treats the airborne path. It is legitimate and often necessary — but it is the last lever, not the first. Silencers are what most people picture when they hear industrial exhaust fan noise reduction, yet every item in this section costs pressure, and none of them fixes a mechanical fault.
Duct Silencers and Attenuators
A duct silencer — a lined splitter section inserted in the duct run — absorbs broadband noise travelling down the duct and reduces the tonal whine reaching the outlet. It is the standard remedy when the fan itself is correct but the discharge point is near occupied space or a boundary. Select it against the fan’s actual spectrum and the required pressure budget: every silencer adds resistance, and the fan must overcome it while still delivering the exhaust duty. Have the supplier size it from your system data, and place it reasonably close to the noise source — a silencer far downstream of junctions and grilles can be bypassed by noise regenerating at those fittings.
Lined Duct Runs and Acoustic Louvres
Acoustically lined ductwork absorbs noise along its length and suits long runs serving quiet areas. Acoustic louvres replace ordinary louvres where the opening itself must pass sound with minimal airflow penalty — typical for plant-room walls facing offices or neighbours. Both attenuate; neither is silent, and both add resistance that the selection calculation must include. Where a wall opening feeds the fan directly, an acoustic louvre often outperforms any treatment on the fan itself, because the opening is where the sound is leaving.
Acoustic Enclosures and the Ventilation They Need
A full acoustic enclosure around the fan is the heavy option, effective against both airborne and some structure-borne noise, and common where a single plant-room fan dominates the neighbourhood soundscape. Two cautions. First, the enclosure needs its own ventilation, or the fan motor overheats and the enclosure turns a noise fix into a reliability problem — ventilated enclosures use baffled, lined paths so air passes but sound does not escape directly. Second, maintenance access must be designed in from the start, or the enclosure will be left open with its door wedged, at which point it does nothing. Confirm enclosure ventilation sizing with the manufacturer against the motor’s heat rejection.
Placement Mistakes That Double the Noise
Some of the worst exhaust fan noise problems are created at installation, before the fan runs its first hour. They cost nothing to avoid and a duct modification to undo.
The Wall-Mount Cavity Effect
A fan recessed into a wall sleeve or boxed into a shallow cavity behaves like a speaker in a drum. The cavity reinforces certain frequencies and re-radiates them across the wall face. Where possible, keep the fan opening flush and unobstructed; where a sleeve is unavoidable, line the sleeve with absorbing material and avoid leaving resonant side walls. If you inherit a fan set in a reverberant recess, lining the cavity is often worth more than any accessory bolted to the fan.
Inlet-to-Outlet Distance and Recirculation
When the discharge sits close to the inlet — a fan exhausting a plume that the inlet immediately re-ingests — the fan works against itself: airflow drops, operating point shifts, and both noise and temperature rise. On walls, separate the intake path and the discharge by a practical distance and avoid discharging into a corner or soffit that returns air to the inlet side. The same geometry rule that governs selection — treated in our industrial axial fan selection guide — governs noise here: a fan struggling against its own exhaust is a loud fan.
Avoiding Resonant Cavities and Panels
Every surface near the fan has natural frequencies, and some will coincide with the blade passing tone. Light-gauge panels, long unsupported duct spans and shallow voids are the usual offenders. Bracing, damping sheets or additional supports retune them; sometimes relocating the fan a short distance is enough to break the coincidence. This is why the Step 4 fingertip survey matters — it finds these elements before you spend on attenuation that the resonance will simply bypass.
The Trade-Off Nobody Quotes: Noise Reduction Versus Airflow
Noise measures are not free. Most of them remove either airflow, pressure margin, or maintenance access, and the honest industrial exhaust fan noise reduction plan weighs the cost explicitly. Use the table below as a first-pass planning aid — the actual numbers depend on the installation and should be confirmed with the manufacturer.
Measure
Noise effect (typical)
Cost in airflow / pressure
Relative effort
Reduce fan speed (VSD or re-selection)
Largest single reduction; source-level
Airflow falls too — recheck exhaust duty
Low to medium
Clean and rebalance impeller
Removes imbalance noise and vibration
None; often restores lost flow
Low
Flexible connectors + anti-vibration mounts
Cuts structure-borne path strongly
Essentially none
Low to medium
Duct silencer
Strong on duct-borne broadband and tone
Noticeable pressure loss — size against system
Medium
Acoustic enclosure
Strong on airborne noise at source
None on the fan, but needs its own ventilation
High
Relocate / improve placement
Removes cavity and recirculation effects
Often improves flow
Site-dependent
What Each Measure Costs You in Flow
Speed reduction trades flow directly; silencers and lined ducts trade pressure; enclosures trade access and heat. Measures at the source — balancing, inlet condition, placement — mostly cost nothing and sometimes restore performance. That asymmetry is the whole argument for the order of attack this article follows: free measures first, structural measures second, purchased attenuation last, and only sized against the pressure the system can genuinely spare.
How to Keep the Exhaust Duty Intact
Before finalising any package, restate the reason the fan exists: the volume of air it must move, against the resistance of the ducts, louvres and filters it actually faces, including everything the noise retrofit just added. If the attenuated system no longer meets the duty, either the fan is re-selected alongside the silencer or the noise fix will simply trade a noise complaint for an extraction complaint. A supplier who sizes attenuation from your real system data — as described in our exhaust fan selection guide — will surface this conflict before it is built in.
Specifying a Low Noise Industrial Exhaust Fan at Purchase
If you are buying rather than fixing, the cheapest industrial exhaust fan noise reduction is specified on the order, not retrofitted on the wall.
What to Ask the Manufacturer
Ask for sound data at your intended operating point, not just at the catalogue’s rated point — noise at reduced speed is a different product. Ask which of the three noise families dominates for that model in your duty, whether the impeller is dynamically balanced as standard, what bearing type is fitted, and whether the company can support a site survey before you commit. A manufacturer such as YIAN ELEC that publishes test data and answers these questions directly is worth more than a marginally lower price on an unverified unit; our high-temperature exhaust fan range, including the BT35-11 industrial exhaust fan, is one example of a line documented this way.
Reading Sound Data Correctly
Catalogue sound figures are measured under defined laboratory conditions at a stated distance — read the conditions, not just the number. Compare sound power and sound pressure level correctly; they are different quantities and mixing them makes any comparison meaningless. Treat the figure as a floor: installed noise will be somewhat higher once your wall, duct and cavity have their say. The table below summarises the data worth requesting.
Data to request
Why it matters
Sound level at your operating point and distance
Rated-point figures overstate how quiet the fan will be in your system
Sound power vs sound pressure, clearly labelled
Different quantities; comparing them across suppliers leads to wrong choices
Balance grade / balance as standard
Imbalance is the most common avoidable mechanical noise source
Bearing type and service interval
Bearing wear is a leading cause of fans growing louder in service
Recommended inlet clearance and mounting
Bad placement can outweigh a good fan’s inherent noise advantage
Frequently Asked Questions
Why is my industrial exhaust fan so loud all of a sudden?
A sudden change almost always means mechanical: dust or an object on the blades unbalancing the impeller, a fastener working loose, a bearing beginning to fail, or something falling into the airstream. Aerodynamic noise from a healthy fan changes gradually with conditions; it does not jump overnight. Isolate, inspect the impeller and mounts first, then re-run the fan and listen.
What is a typical exhaust fan noise level in a factory?
It depends far more on size, speed and installation than on any general figure, so no single number is meaningful — a small cabinet-scale unit and a large wall exhaust are different products entirely. Read the manufacturer’s data for your model at your operating point, and measure on site at defined positions, since installed levels run above laboratory figures. Confirm both with the manufacturer before setting any internal limit.
Do silencers reduce airflow?
Yes — a silencer adds resistance, and the fan’s delivered airflow falls unless the system has pressure margin to spare. That is why attenuation must be sized against the system’s real resistance, and why the source-first order of this article matters: measures such as balancing and speed reduction cut noise without consuming pressure budget. If a silencer is needed, re-verify the exhaust duty after installation.
Can I make an existing fan quieter without buying anything?
Often, meaningfully. Clean and rebalance the impeller, tighten every fastener, restore the inlet’s straight clear run, stiffen or damp the panel that buzzes under your fingertip, and check that the fan is not recirculating its own discharge. None of this costs parts money, and together these steps frequently account for the majority of an inherited noise problem.
When should I replace the fan instead of treating the noise?
Replace when the fan is undersized for its duty (running at high speed permanently and loudly as a result), when the impeller or motor is worn beyond economic repair, or when a correctly sized larger-slower impeller would solve both noise and reliability. If balancing, bearings and placement have all been addressed and the noise is still dominated by aerodynamic tone at the operating point, a different fan — not more attenuation — is the honest answer.
A Sensible Order of Attack
Diagnose before you buy: separate aerodynamic, mechanical and electromagnetic noise, because the remedies do not overlap. Then work in the order that treats causes first — speed and blade selection, balance and bearings, isolation and placement, and only then purchased attenuation such as silencers, lined duct or an enclosure, sized against the pressure the system can truly spare. Measure before and after every step, and keep the exhaust duty as the fixed constraint that no noise measure is allowed to break. Specified correctly at purchase and maintained on a simple schedule, an industrial exhaust fan can run for its whole life without becoming the loudest thing on the site — and the decisions that get it there cost nothing extra.
A symptom-first guide to an exhaust fan not working: five failure patterns, power, control and capacitor checks, bearing faults, air-path blockages, and how to match a replacement fan.
A practical guide to selecting and replacing a cooling fan for welding machine enclosures: heat sources, airflow path, fan specs, five common failures, and a step-by-step workshop swap.
An EC plug fan pairs a brushless external-rotor motor with a backward-curved impeller and no scroll housing. This guide covers AHU selection, control signals and retrofit steps.