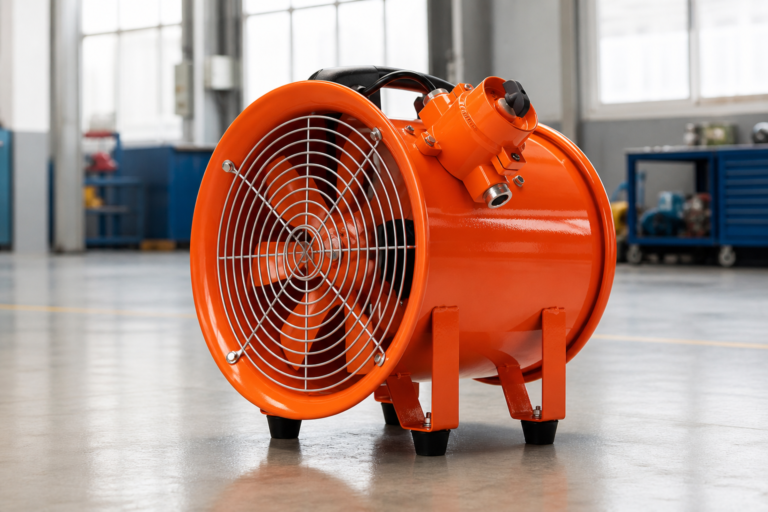
Cabinet Fan Airflow Direction: Push, Pull or Push-Pull?
Published: Author: Rachel
Mount the same fan facing one way and it can keep a control panel clean for a decade. Turn it around and the identical fan drags grit, moisture and conductive dust through every door seam. Nothing else changes — not the fan, not the cutout, not the airflow rating on the label. Only the direction.
Cabinet fan airflow direction decides three things at once: whether the enclosure runs under positive or negative pressure, which way unfiltered air leaks through the gaps, and how hot the fan’s own motor runs. All three move failure rates more than a few extra CFM of rated airflow ever will.
This guide covers how to choose the direction, how to verify it on a fan that is already bolted in place, where to cut the openings, and the situations where the usual rule has to be inverted.
What Cabinet Fan Airflow Direction Actually Decides
An enclosure fan does one of two jobs, and the two jobs point in opposite directions. Knowing which job you are buying for settles most of the argument before it starts.
Two Jobs, Two Directions
Whole-enclosure ventilation. The fan moves air through the cabinet as a system, replacing heated air with cooler ambient air. This is what a panel or cabinet cooling fan is for, and the question is one of volume: the fan must exchange enough air to hold the internal temperature at a target rise above ambient.
Spot cooling. The fan drives a narrow, higher-pressure stream onto one hot component — a heatsink, a drive module, a power supply. This is the job of a small fan or blower mounted on the component itself.
Spot cooling nearly always means blowing toward the target. Whole-enclosure ventilation is where the push-or-pull decision actually lives, and where most installation errors happen.
Why Direction Outweighs Fan Size
A fan that is one size too small runs a few degrees warmer than ideal, and the cabinet still works. A fan mounted the wrong way can double the dust load inside the same enclosure, and dust is the failure mode that shows up in service records years later — corroded boards, shorted terminals, blocked heatsink fins.
There is a second, quieter cost. The fan motor of an exhaust-mounted unit sits permanently in the hot airstream it is removing. That raises winding and bearing temperature continuously, so bearing grease ages faster and the fan’s service life shortens. Direction is therefore a reliability decision, not only a thermal one. If you want the longer version of that trade-off, our guide to axial fan lifespan breaks down what actually ends a fan’s life.
The Short Answer: Pressurize the Cabinet, Don’t Vacuum It
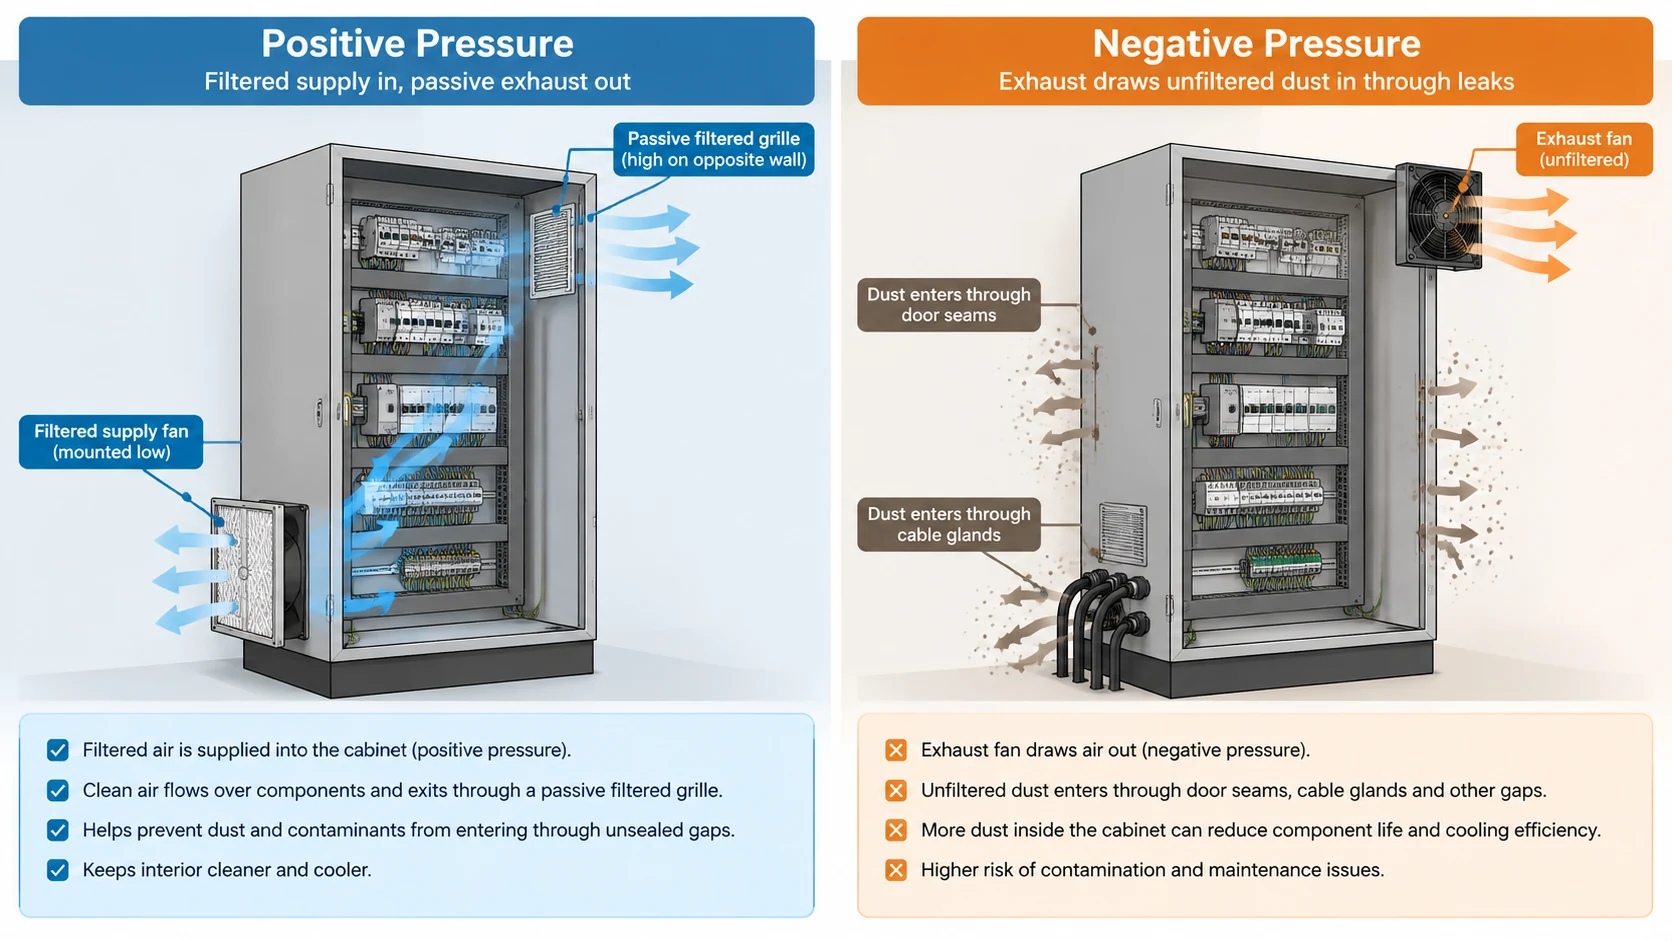
For a general industrial enclosure, mount the active fan low on the cabinet and set it to blow filtered air in. Add a passive filtered grille high on the opposite wall for the air to leave through. That is the default, and it is the default for a specific reason.
What Positive Pressure Actually Protects
When the fan pushes air into a cabinet, internal pressure rises slightly above the surrounding room. Air then escapes outward through door seams, cable gland plates, side-panel joints and every other small gap. Because the only path in is through the filter, every cubic metre that enters has already been cleaned.
Reverse the fan and that logic inverts. Air is pulled out faster than it can be replaced through the filtered opening, so the enclosure is now at a slight vacuum. The missing air arrives through the unfiltered gaps instead. In a workshop with airborne metal dust or conductive carbon particles, that is how a clean panel becomes a contaminated one without anyone noticing.
Dust is not the only passenger. Where ambient humidity is high or washing-down is routine, moisture rides in the same way and settles on terminals. The measured benefit of pressurization is not a bigger temperature drop — it is a slower rate of contamination, which is why the rule holds even in cabinets that are comfortably cool.
The One Situation That Justifies Reversing the Fan
There is a genuine exception. If the heat sources sit at the top of the enclosure, or the top panel is the only surface you can cut because the door faces a walkway and the sides are bolted to a busbar trunking run, then a top-mounted fan should exhaust, not supply.
Reversing it makes physical sense: hot air pools at the top of the enclosure. Blowing more air in at that point pushes the hottest layer back down across the components instead of removing it. Exhausting at the top pulls the accumulated hot layer straight out and lets cooler air enter lower down.
Two conditions make this acceptable rather than merely convenient: the surroundings should be relatively clean, or the opening should still carry filter media. A top-mounted exhaust fan in a dirty environment is the worst of both worlds — it removes heat and simultaneously guarantees an unfiltered ingress path.
Why “Front In, Rear Out” and “Bottom In, Top Out” Are Both Correct
You will see both phrases in manufacturer literature, and they are not in conflict. They describe the same rule viewed from different faces of the cabinet:
Bottom in, top out follows buoyancy. Cool air is denser and settles, warm air expands and rises, so aligning the flow with that gradient gives you free assistance.
Front in, rear out describes which faces of a floor-standing panel normally carry the intake and exhaust, because the front door is where the filtered fan unit is usually cut and the rear or side face is where a passive grille is least in the way.
When the two phrases disagree in a real panel, buoyancy wins. Vertical alignment matters more than which pair of walls you use.
Push vs Pull vs Push-Pull: The Three Configurations Compared
Every practical layout reduces to one of three arrangements. The names come from the fan’s action relative to the enclosure, not from any particular brand or model.
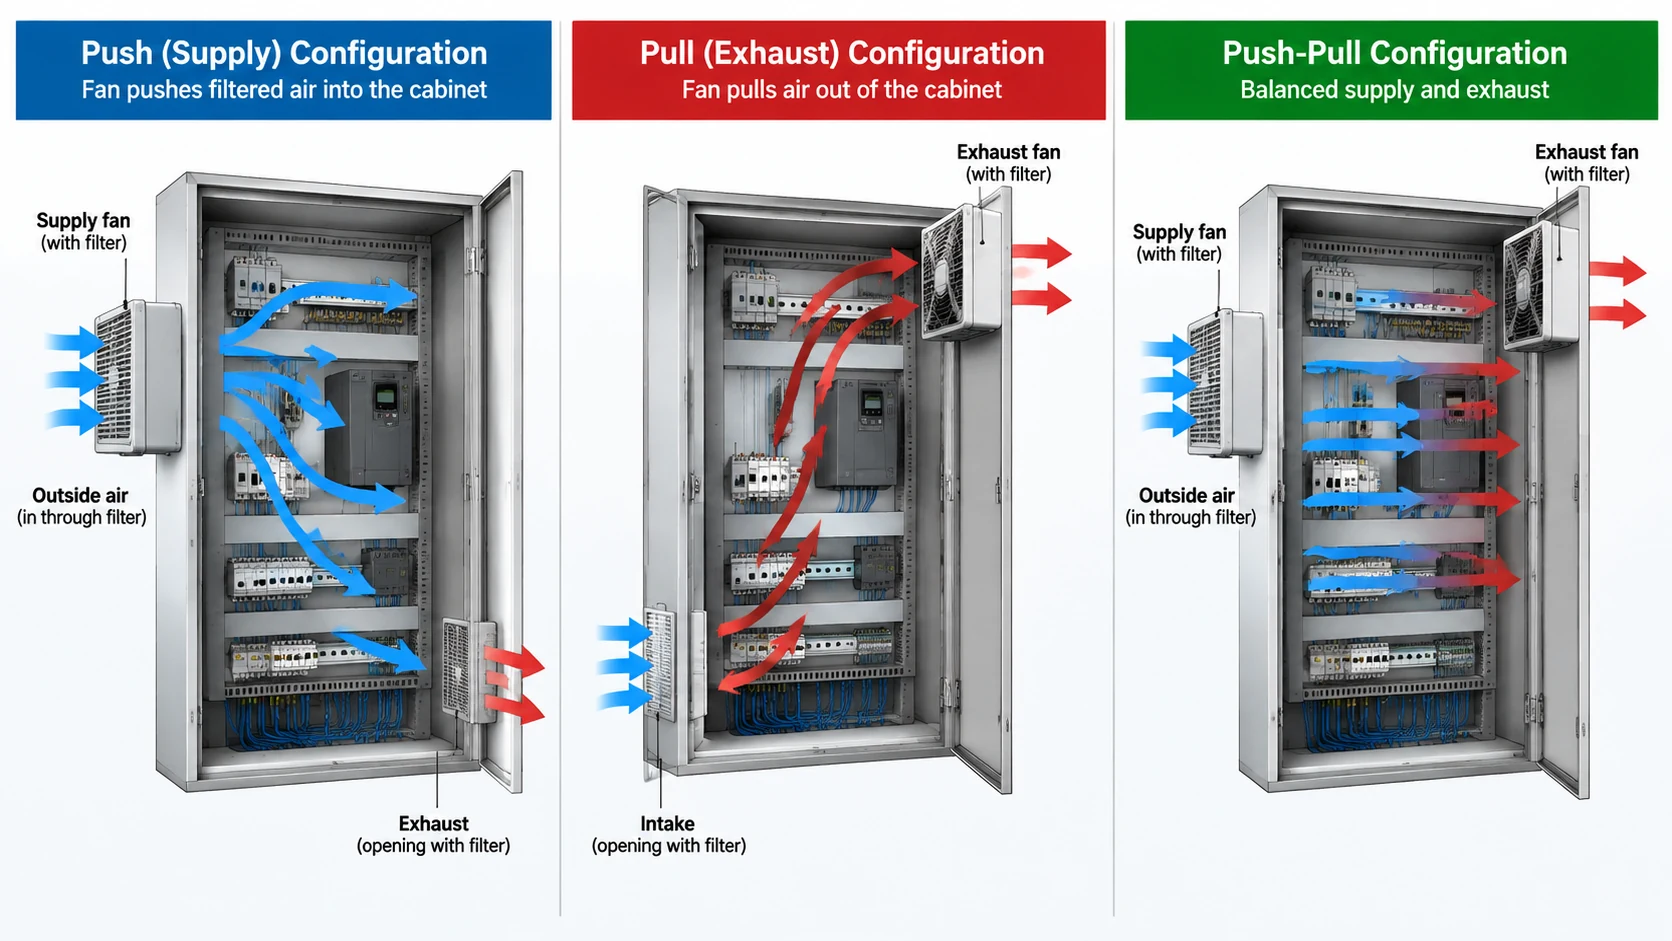
Push (Supply): Setup, Strength, Weakness
One filtered fan unit low on the cabinet, blowing in. One passive filtered grille high on the opposite wall.
Strength: the cabinet runs at positive pressure, so all incoming air passes through filtration. The fan motor also sits in the cooler, filtered airstream, which is kinder to bearings.
Weakness: airflow depends on hot air finding its way out of the passive grille. If the grille is undersized, high, or partly blocked by internal hardware, the fan works against back-pressure and delivers less than its rated flow.
Pull (Exhaust): Setup, Strength, Weakness
One fan unit high on the cabinet, arranged to extract. One passive filtered grille low on the opposite wall.
Strength: hot air near the top is removed directly rather than being displaced by incoming air, and even distribution across top-mounted components can improve.
Weakness: the cabinet is drawn into negative pressure, so unfiltered air enters through every unsealed gap. The fan motor runs in the hottest airstream in the system. This configuration is defensible in clean, climate-controlled rooms and hard to defend on a factory floor.
Push-Pull (Balanced): When the Second Fan Earns Its Keep
Two fan units, one supplying low and one exhausting high. Delivered airflow rises substantially, because two fans in series add static pressure and overcome the resistance of dense internal layouts, filter media and grilles far better than one fan can.
It pays for itself when airflow resistance is the bottleneck: cabinets packed with drives and transformers, filter mats that clog quickly, or an exhaust path with a long duct. It is not a substitute for correct layout — two fans in a badly designed cabinet just move hot air around faster.
Configuration
Cabinet pressure
Dust behaviour
Fan motor environment
Best fit
Push (supply low, passive exhaust high)
Positive
All incoming air filtered
Coolest — sits in filtered inlet air
Dusty or humid industrial rooms; the default choice
High internal resistance, heavy heat load, ducted exhaust
How to Confirm Direction on a Fan That Is Already Mounted
Direction errors survive commissioning because nobody checks. A fan that spins and makes noise looks correct. Confirming cabinet fan airflow direction on hardware that is already installed takes about two minutes.
The Arrow on the Housing
Most axial fans carry a moulded or printed arrow on the casing showing the airflow direction, plus a separate curved arrow showing shaft rotation. Treat the airflow arrow as the authority — but check it against reality, because housings get rotated during assembly and the arrow can end up meaningless.
Rotation Direction Is Not Airflow Direction
This is the confusion that causes most reverse-mounted fans. A fan can spin clockwise whether it is blowing or sucking; reversing the supply leads reverses rotation, but reversing rotation does not necessarily reverse airflow in the way an installer expects. An axial impeller moving the wrong way still moves air in the direction its blade geometry dictates — just badly, with much lower flow and more noise.
The practical consequence: never infer airflow from which way the blades turn. Infer it from which side is the suction side. On an axial fan, the suction side is the open frame face with the blade leading edges; the discharge side is the side the motor struts and hub face. Hold a strip of paper near the frame; the side that pulls it against the guard is the intake face of the fan.
A Two-Minute Field Test
Once the fan is mounted and running with the door closed, verify the cabinet state rather than the fan:
Hold a smoke pencil or a thin strip of tissue at a door seam near the bottom of the cabinet.
If the smoke is pushed away from the seam, the cabinet is under positive pressure. This is what you want on a factory floor.
If the smoke is drawn into the seam, the cabinet is under negative pressure. Find out why before accepting it — either the fan is installed as an exhaust, or the filtered inlet is blocked or undersized.
Repeat at a seam near the top. The direction of leakage should be the same; if it is not, internal airflow is short-circuiting and the layout needs rework.
Record the result. The same test takes seconds at each maintenance visit and catches a clogged filter before it becomes a contamination event.
Where to Cut the Openings: Working With Thermal Buoyancy
Direction is only half of the layout. The openings have to cooperate with the direction or the fan fights itself.
Intake Low, Exhaust High
Place the active intake in the lower third of the cabinet and the passive exhaust opening in the upper third. Cold air enters low, rises through the components as it absorbs heat, and leaves high. This alignment gives the fan buoyancy as an ally instead of an opponent, and it is the single most effective layout change available in a retrofit.
Why Diagonal Beats Stacked
Two openings directly above one another on the same wall create a short vertical channel. Air enters and leaves through almost the same column, sweeping only the components in that corridor and leaving everything else in still air.
Offsetting the intake and exhaust — intake low on one face, exhaust high on the opposite or adjacent face — forces the airstream to traverse the enclosure diagonally. That path crosses far more component surface area, which is what actually lowers component temperature. A diagonal arrangement is usually worth more than a bigger fan.
Top-Mount Cutouts and the Reverse-Flow Exception
If the only available face is the top panel, mount the fan to exhaust, as discussed earlier, and keep at least one low filtered inlet on a side or door face. A top-mounted exhaust with no low-level filtered inlet is the worst case: it will pull air through whatever gaps exist rather than through filtration, and it will do so continuously.
Keep obstructions clear around both openings. Airflow follows the path of least resistance, and a fan unit boxed in by a cable duct on three sides will simply circulate air within its own immediate volume.
What Kills Airflow Inside the Enclosure
Two cabinets can carry identical fans and identical cutouts and still run twenty degrees apart. The difference is almost always internal geometry.
Short-Circuiting: The Fan That Cools Nothing
Short-circuiting means the fan’s own discharge finds an immediate path back to its intake without crossing the heat sources. The classic case is an intake low on the front door and an exhaust immediately above it on the same door, with a horizontal barrier between them. Air enters, turns, and leaves, and the components in the middle never see it.
The symptom is easy to recognise: the fan is running, the cabinet is still hot, and the exhaust air feels cool. If the air leaving an enclosure is not warm, the air is not carrying heat away from anything.
Cable Trays and Transformers Acting as Dams
Internal hardware blocks airflow the way a dam blocks a river. A wide horizontal cable tray spanning the enclosure, or a heavy transformer mounted mid-height, interrupts the vertical path and leaves a stagnant pocket beneath it. The result is a heat island directly behind the obstruction, with only a few centimetres of clearance to work with.
The fix is layout, not more airflow. Orient high-heat components into the established airstream, break cable trays so they do not span the full width, and leave clearance around every fan intake. For cabinet-specific sizing and component placement decisions, our guide to selecting a cooling fan for an electrical cabinet works through the calculation side.
Dead Zones Behind Components
Every component casts a wake. In a densely populated backplate, those wakes overlap and the region behind the mounting rail becomes effectively still air. This is where the hottest spot in a supposedly well-ventilated cabinet usually sits, and it is why temperature measurements taken at the cabinet exhaust can look reassuring while a drive module near the bottom runs near its limit.
How Filters Change the Pressure Balance
A filter is not a neutral accessory. It is a flow restriction that grows with time, and it sits on the one path that makes positive pressure work.
Filter Media and Pressure Drop
Every filter medium resists airflow, and the resistance rises steeply as it loads with dust. A clean mat costs little. A loaded mat can cost enough that the fan’s delivered airflow falls well below its rated figure — and a fan’s rating is always measured against free air, not against the resistance of a real installation.
This is why fan selection has to be done against the pressure-airflow curve, not against the headline airflow number. A fan with a steep curve holds flow better as resistance rises; a fan with a shallow curve loses it quickly. For high-resistance paths with dense filter media, electronically commutated units maintain flow more steadily than basic AC fans, which is the trade-off described in our comparison of AC fans and EC fans.
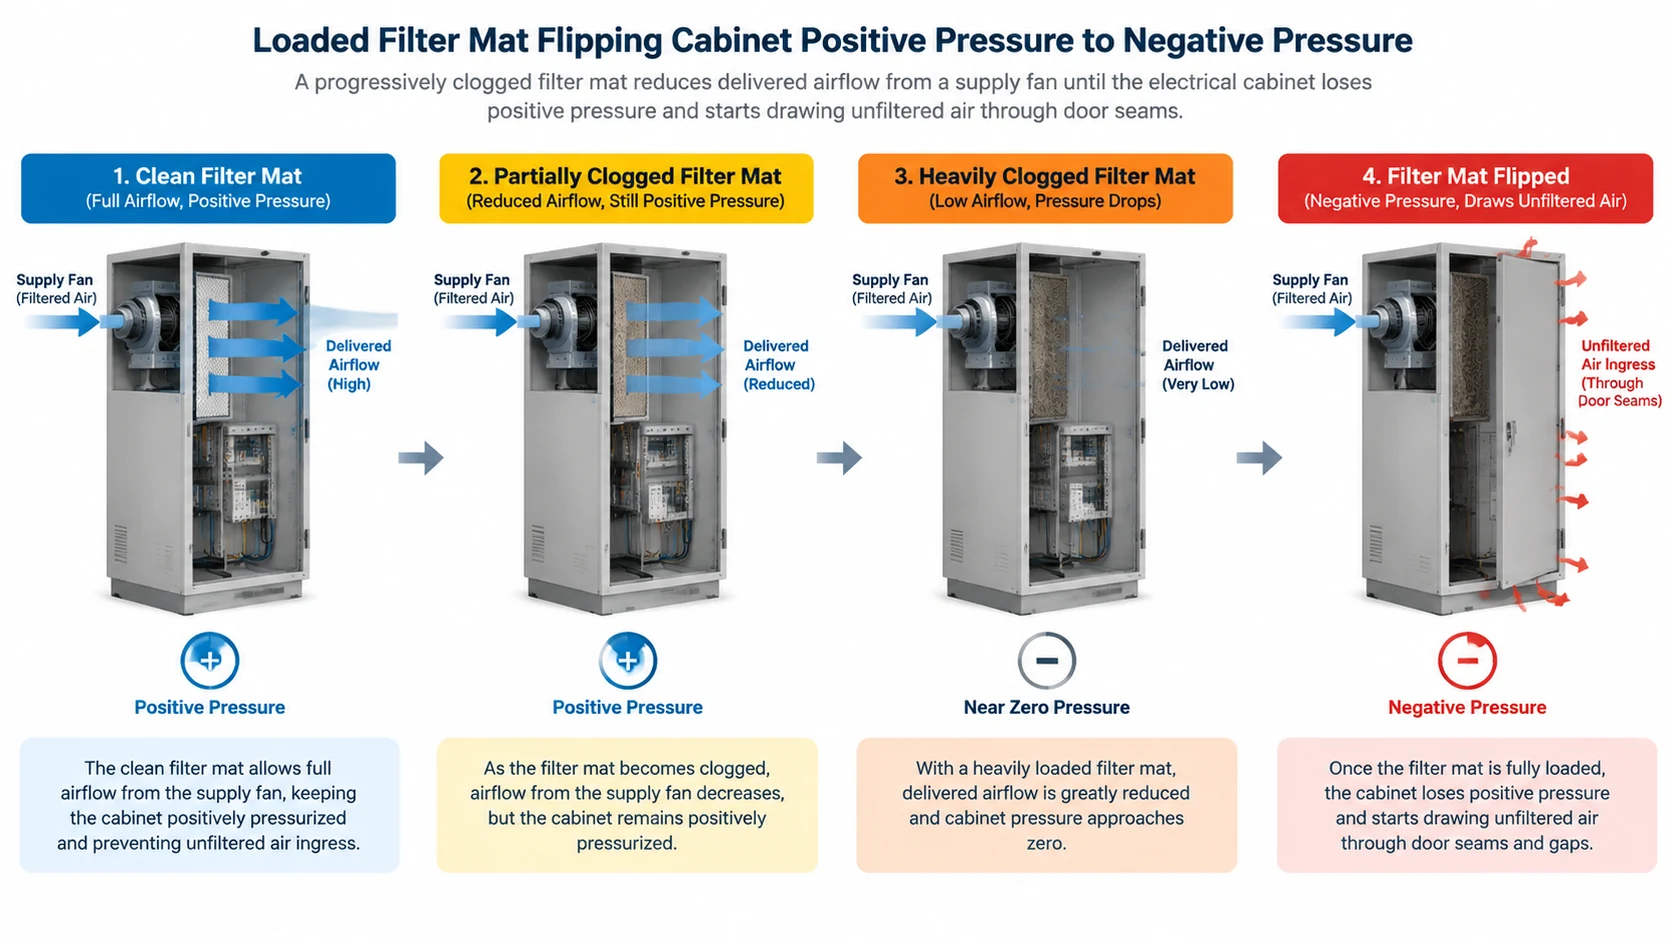
The Flip That Turns Positive Pressure Negative
Here is the failure mode most installers never anticipate. A cabinet set up correctly as a push configuration can silently become a negative-pressure cabinet once the intake filter loads up. The supply fan cannot push air through the clogged mat, so the enclosure stops being pressurized. If a second exhaust unit is present, it continues to extract, and the cabinet is now under vacuum with unfiltered air entering through every seam.
The cabinet has been contaminated, but no alarm has sounded and no fan has failed. The only reliable defences are a maintenance interval that matches the environment and a quick pressure check at each visit.
Environment
Typical filter inspection interval
What to watch for
Clean, air-conditioned control room
Every 3–6 months
Slow discolouration; little measurable pressure change
General industrial workshop
Every 1–3 months
Visible dust loading; warming exhaust air
Foundry, woodworking, cement, textile
Every 2–4 weeks
Rapid loading, dust bridging across the mat
Outdoor or wash-down duty
Monthly, plus after storms
Moisture, caked media, degraded gaskets
Intervals are indicative. Confirm them against the enclosure manufacturer’s instructions and your own site conditions, and replace filter media rather than merely tapping dust out of it — cleaning restores resistance poorly and can damage the medium.
A Worked Example: An Outdoor Panel in a Dusty Yard
Consider a floor-standing distribution panel at a quarry weighbridge: outdoor, unshaded, ambient ranging from below freezing to high summer heat, and airborne stone dust year-round.
Step 1 — Estimate the Heat Load
Total the dissipation of everything inside: drives, contactors, a transformer, meters and wiring losses. Suppose the sum is around 400 W. Decide the allowable internal rise above ambient. If the components are rated to 55 °C and summer ambient can reach 40 °C, only 15 K of rise is available, which is a demanding target.
Use the standard first-pass relationship for forced ventilation:
For 400 W and 15 K that gives roughly 83 m³/h. This is a starting figure only, calculated against free air. The fan actually selected must deliver that flow at the system’s real resistance, and it must do so on the hottest day of the year, at the site’s altitude. Confirm the final selection against the manufacturer’s selection data or software rather than a single formula.
Step 2 — Read the Environment
Airborne stone dust and outdoor exposure settle the direction question immediately. Positive pressure is not optional here, because the alternative is drawing abrasive dust through every seam of an enclosure sitting in a yard. Solar gain also matters: an unshaded south-facing panel body can sit well above air temperature, so treat the effective ambient as higher than the weather forecast.
Step 3 — Fix Direction, Openings and Filter Class
Direction: supply low, passive filtered exhaust high on an opposite or side face.
Fan unit: a filtered fan unit with a matched filter-hood assembly, sized on its pressure-airflow curve at the calculated resistance, with an IP-rated housing suitable for outdoor use.
Filter class: choose the finest medium the fan can still overcome. An over-fine filter on an under-powered fan delivers less air than a coarser one and loads faster.
Verification: after commissioning, run the smoke test at the door seams. Positive pressure confirmed, or the installation is not finished.
These four errors pass commissioning and then quietly cost money.
The Fan Installed Backwards
The unit is fitted so that the airflow arrow points into the cabinet, but the impeller and housing were assembled in the opposite orientation. The result is a fan that runs, sounds plausible, and has been working against its own installation since day one. Verify with the paper strip and the smoke test, not with the label.
Two Fans Fighting Each Other
In a push-pull cabinet with two identical units, an installer who reverses one to “balance the airflow” turns the pair into opponents. Each fan reduces the other’s delivered flow, and total airflow can end up below a single fan’s rating. Opposite-direction pairs only work when they are deliberately arranged as supply and exhaust with separated openings, and even then the mechanical spacing matters — fans mounted face to face in the same opening simply churn air.
Sealing Every Gap, Then Wondering Why Nothing Cools
Positive pressure requires somewhere for the air to leave. An installer who gaskets every seam, glands every cable entry and seals the door will build a genuinely airtight box, at which point a small fan can barely move any air through it. The correct target is a filtered path in and a deliberate, filtered path out, with the remaining gaps simply left as leakage. Weatherproofing and ventilation have to be designed together, not one after the other.
Ignoring the Effect of Altitude
Air is thinner at altitude, so a given volume of it carries away less heat. A fan selected at sea level will under-perform at elevation for the same m³/h figure. Where a site sits meaningfully above sea level, the airflow requirement has to be adjusted upward. Check the applicable derating guidance before ordering.
Frequently Asked Questions
Should a cabinet fan push or pull air?
For most industrial enclosures, push filtered air in so the cabinet runs at positive pressure. Pull, or exhaust, is the right choice when heat sources are concentrated at the top of the enclosure and a top-mounted opening is the only practical cut. In a dusty environment, that single rule settles cabinet fan airflow direction more often than any other factor.
Which way should a fan face in a control panel?
Mount the unit low on the enclosure with its airflow arrow pointing inward, and fit a passive filtered grille in the upper third of an opposite or adjacent face. Then confirm it with a smoke test at the door seams rather than trusting the arrow alone.
Can two cabinet fans run in opposite directions?
Yes, if they are deliberately arranged as a supply and an exhaust with separate openings, one low and one high. That is a push-pull configuration and it increases delivered airflow against high internal resistance. What does not work is two fans mounted in the same opening facing opposite ways, or reversing one of a matched pair at random.
Is blowing better than exhausting for cabinet cooling?
Not in raw cooling terms — both move heat out. Blowing wins on contamination control, because it pressurizes the enclosure and forces all incoming air through filtration. Exhausting wins in a few layout situations where top-mounted heat must be removed directly. In a dirty environment, the filtration advantage usually decides it.
How do I tell whether my cabinet is under positive or negative pressure?
Close the door with the fan running and hold a smoke pencil or a strip of tissue at a door seam. Smoke pushed away means positive pressure. Smoke drawn into the seam means negative pressure, and you should find the cause — a reverse-mounted fan, an undersized inlet, or a loaded filter — before leaving it in service.
What to Check Before You Drill
Decide cabinet fan airflow direction from the environment and the heat distribution, not from habit. Pressurize the enclosure unless the layout genuinely forces a top-mounted exhaust. Put the intake low, the exhaust high, and offset them so the airstream crosses the components instead of skirting them. Size the fan against its pressure-airflow curve at the resistance your filters and grilles will actually present, not against the free-air rating. Then verify the result with a smoke test and re-verify it at every maintenance visit, because a loaded filter can quietly reverse the pressure state you designed for.
If you are choosing between cabinet fan types for a specific panel, our range of industrial cooling fans covers the common frame sizes, and our team can review a panel drawing and confirm the layout before you cut metal.
How to size and select a cooling fan for server rack duty: heat load to CFM, component fans vs cabinet ventilation, AC vs DC power, airflow direction, filters, noise and N+1 redundancy.
Engineering guide to electrical cabinet cooling fan selection: heat-load formula, airflow calc, AC vs DC, IP rating, selection checklist, filter fan vs heat exchanger vs A/C.